

Making an epoxy resin river table isn’t just a craft; it’s an experience. This DIY project allows you to design your own unique table that blends nature with modern art. With a little creativity and the right materials, you can transform a simple piece of wood into a stunning centerpiece. The key lies in understanding how to work with epoxy resin and achieving the perfect flow between the wood and resin to create that river effect. Plus, you’ll learn about the best techniques for mixing, pouring, and curing the resin to ensure a professional finish.
Epoxy resin river tables have become a popular trend in the world of furniture making, and for good reason. They offer a beautiful, customizable look that’s perfect for any modern home or office. The ability to choose your own wood type, resin color, and the unique way you set the flow of the resin makes each table one-of-a-kind. Once you master the basics of working with epoxy resin, you’ll be amazed at the endless possibilities that await.The process may seem daunting at first, but with a bit of patience and the right tools, you’ll be able to create a masterpiece that’s both functional and visually striking. Whether you’re looking to make a dining table, a coffee table, or even a unique countertop, learning how to make an epoxy resin river table is a rewarding and creative journey. Dive into this guide and discover the essential steps and tips to make your own river table today!
If you’re into woodworking and love a challenge, making an epoxy resin river table is one project you don’t want to miss! The contrast of natural wood with the sleek, colorful flow of resin is a mesmerizing sight. But the appeal isn’t just in the aesthetics, it’s also about the process. With the right materials and technique, you’ll learn to combine creativity with craftsmanship to produce something extraordinary.
Think about it, what could be more satisfying than creating a custom piece of furniture that’s all your own? Each table tells a story, from the choice of wood to the unique design of the resin. Not only will you have a conversation starter in your home, but you’ll also feel the pride of having built it yourself. Get ready to dive into the world of epoxy resin, where the boundaries are limited only by your imagination!
So, are you ready to get your hands dirty and make something truly amazing? Follow this step-by-step guide, and in no time, you’ll be creating your very own epoxy resin river table that’s not just functional, but a beautiful work of art.
Pros
- Single deep pour capability saves time and reduces risk of layer lines
- Crystal clear and bubble-free right out of the mix, with high gloss self-leveling
- UV-resistant formula helps maintain clarity and color stability over time
- Long work time (80 minutes) allows for detailed, intricate projects
Cons
- Deep pour requires careful temperature control and proper mixing to avoid overheating
- 1.5 gallon size may be more than needed for small crafts or single projects
- Curing time is slower than thinner pours, so patience is needed for demolding
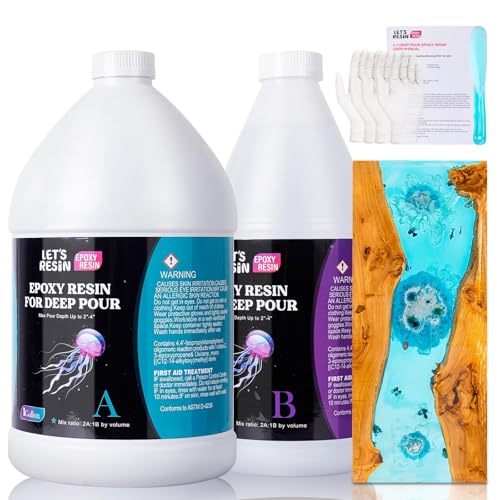
While not a piece of furniture itself, LET'S RESIN Deep Pour Epoxy Resin is a key material for creating custom furniture and home decor. This 1.5-gallon kit is formulated to pour up to 4 inches deep in a single lift, making it especially popular for river tables, countertops, flower preservation, and artistic casting. For U.S. homeowners, apartment renters, and DIY enthusiasts looking to add a personalized, high-gloss finish to their living spaces, this resin offers a practical solution that combines simplicity with professional-grade results.
One of the standout features is the low viscosity (1000 cps), which helps the resin flow into intricate mold details and around delicate objects like dried flowers or wood slices. The bubble-free formula reduces the need for a pressure pot, though careful mixing and a warm environment can further minimize any stray air. The crystal clear finish holds up well against UV light, resisting yellowing better than many competitors according to manufacturer claims. This is crucial for projects like a dining table or coffee table top that will sit in a sunlit room.
Usability is straightforward if you follow the instructions. The 2:1 mixing ratio by volume is easy to measure, and the 80-minute working time gives you plenty of room to arrange items, add colorants like mica powders or alcohol inks, and pour without rushing. The slow cure also helps reduce shrinkage and cracking, which is a common concern with thick pours. For those new to resin, the clear manual and support from the brand add a layer of confidence.
Build quality of the resin itself is backed by multiple improvements and testing, resulting in a durable, scratch-resistant surface once cured. It self-levels beautifully, meaning you can achieve a smooth, glossy finish without extensive sanding or polishing. This makes it ideal for functional pieces like coasters, serving trays, or even jewelry that will see everyday handling.
One realistic limitation is that deep pours generate more heat during curing, so careful monitoring of temperature is essential to prevent cracking or excessive exotherm. Also, the 1.5-gallon size is generous; if you are only experimenting with small molds, a smaller kit might be more economical. Curing time is slower than thin pours, so you'll need patience – but the results are worth it.
Overall, LET'S RESIN Deep Pour Epoxy Resin is a strong choice for U.S. furniture makers, crafters, and home decorators who want a reliable, clear, and easy-to-use resin for large projects. Whether you are building a river table for your living room, preserving flowers for a keepsake box, or casting coasters for your Airbnb rental, this kit delivers the clarity and durability needed for beautiful, long-lasting results.
The crystal clear finish of this resin is its most praised feature. Users report that items embedded in the resin remain highly visible with minimal distortion. The UV resistance helps maintain that clarity even in sunlit rooms. The low viscosity allows it to flow into tight spaces, capturing fine details in molds or around delicate objects. For best results, work in a warm, dust-free environment and stir gently to avoid introducing bubbles. The 2:1 ratio is forgiving and easy to measure without a scale.
This deep pour epoxy is ideal for river tables, countertops, flower preservation, art pieces, jewelry, coasters, and small furniture accent tops. Its compatibility with various colorants means you can achieve anything from a natural clear look to vivid, swirling colors. The 80-minute working time gives hobbyists and pros alike the freedom to create complex layered designs or embed multiple items without rushing. It is also suitable for filling large molds, making it a go-to for those who enjoy large-scale casting.
Once fully cured, the resin forms a hard, scratch-resistant surface that can withstand normal use. It is self-leveling and achieves a high-gloss finish without additional coatings. For maintenance, simply wipe clean with a damp cloth; avoid harsh chemicals or abrasive cleaners. The UV-resistant formula helps prevent yellowing over several years, though direct, constant sunlight may still cause slight ambering. If you need to sand or polish the surface, standard wet-sanding techniques work well.

Pros
- Comprehensive 9-step guide makes the process easy to follow
- Focuses on creating a beautiful, functional piece of furniture
- Great for both beginners and experienced DIYers
- Digital format allows instant access and portability
Cons
- Requires separate purchase of materials, tools, and epoxy resin
- Digital only – no physical product or printed book included
- May need additional research for specific wood types or resin brands
The "9 Step To Make Beautiful An Epoxy Resin River Table With Wood" is a Kindle eBook that serves as a practical guide for anyone interested in building their own river table. This type of furniture piece has become increasingly popular in modern and farmhouse-style homes, offering a unique blend of natural wood grain and glossy resin that creates a stunning visual centerpiece. Whether you're a homeowner looking to add a custom touch to your living room, a DIY enthusiast wanting a new project, or an interior decor shopper seeking a one-of-a-kind piece, this guide provides a structured approach to achieving professional-looking results.
This guide is best suited for U.S. homeowners, apartment renters, families, and even Airbnb hosts who want to create custom furniture that reflects their personal style. It's also ideal for small-space dwellers who need a table that fits a specific dimension or shape, as the instructions can be adapted to various sizes. College students and home office users may also appreciate the ability to build a durable desk or work table that matches their decor without spending thousands on a pre-made version.
In terms of real-world performance, the guide focuses on the practical steps from wood selection to resin pouring and finishing. It emphasizes comfort and usability by teaching how to create a smooth, level surface that's both sturdy and visually appealing. The instructions also cover stability and durability, ensuring the finished table can withstand daily use. While the eBook itself doesn't provide physical materials, it offers valuable insights on choosing the right wood, epoxy resin, and tools to achieve a long-lasting piece.
Build quality is addressed through detailed explanations of preparing the wood, sealing the mold, and mixing resin properly. The guide highlights techniques to avoid bubbles, achieve even color distribution, and create a flawless finish. It also discusses sanding and polishing steps to ensure the table's surface is smooth and resistant to scratches or water damage. For those concerned about maintenance, the eBook includes tips on cleaning and caring for the finished table to preserve its beauty over time.
Ease of setup and assembly is a key strength of this guide. The step-by-step format breaks down the process into manageable stages, from creating the mold to the final pour. While building a river table requires patience and attention to detail, the instructions are clear enough for beginners to follow. However, it's important to note that this is a digital product, so you'll need to purchase materials like wood slabs, epoxy resin, pigments, and safety equipment separately. The guide does not include hands-on support or video tutorials, but the written instructions are comprehensive.
Realistic limitations include the need for a dedicated workspace, proper ventilation when working with resin, and a time commitment that can span several days due to curing times. Additionally, the cost of materials can add up, especially if you choose high-quality wood and resin. Despite these factors, this guide offers excellent value for DIY furniture enthusiasts who want to create a custom river table at a fraction of the cost of a store-bought piece. For anyone ready to invest time and effort, this eBook is a practical starting point for building a beautiful, functional piece of furniture that can become a conversation starter in any room.

Pros
- Excellent UV resistance helps maintain clarity over time, especially for white or light-colored projects
- Bubble-free finish with self-leveling properties reduces sanding and polishing effort
- Heat resistant up to 203°F, suitable for tabletops and counters that see daily use
- Low odor and non-toxic, making it safer for indoor use without strong fumes
Cons
- Requires pouring in 1/4 inch layers for best results, which can be time-consuming for thick projects
- Some users may find the 40-minute working time tight for large or complex pieces
- Curing time may vary with temperature and humidity, needing careful environment control
The TAKIMO 68oz epoxy resin kit is a versatile solution for anyone looking to add a durable, high-gloss finish to furniture or DIY projects. While it's not a piece of furniture itself, this resin is commonly used to coat tabletops, river tables, bar tops, and other home surfaces, making it a practical choice for homeowners, crafters, and small-space dwellers who want to protect and beautify their creations.
This kit is best suited for U.S. homeowners, apartment renters, families, and interior decor shoppers who enjoy DIY projects. It's also great for Airbnb hosts looking to refresh tabletops or counters with a glossy, durable finish. The 68oz size is ideal for medium to large projects like a coffee table or desk, while smaller sizes are available for coasters or jewelry.
In real-world use, the resin's automatic defoaming and self-leveling properties help achieve a bubble-free, liquid glass finish. The 3x UV resistance is a standout feature, preventing yellowing over time, which is crucial for pieces placed in sunny rooms. The cured resin forms a scratch-resistant, heat-resistant shield (up to 203°F), making it practical for everyday use on tabletops and counters. However, for best results, you'll need to pour in 1/4 inch layers, which can extend project time for thicker coatings.
Build quality is solid with a non-toxic, low-odor formula that's safe for home studios. The 1:1 mixing ratio by volume simplifies the process, reducing guesswork. The 40-minute working time gives you enough flexibility to spread and manipulate the resin, but it may feel tight for large or intricate projects. Cleaning up requires isopropyl alcohol before curing, and once cured, the surface is easy to wipe clean.
A realistic limitation is that the resin's performance depends on environmental factors like temperature and humidity. Curing can be slower in cooler conditions, and bubbles may form if not mixed carefully. Also, while the kit includes clear instructions, beginners might need to practice on small items first to get a flawless finish.
Overall, the TAKIMO 68oz epoxy resin kit offers excellent value for DIY furniture enthusiasts and home decorators. It's a reliable choice for creating durable, glossy surfaces that resist yellowing and wear. Whether you're coating a river table for your living room or a bar top for your patio, this resin delivers professional-looking results with manageable effort.

Pros
- All-in-one kit saves time and hassle of sourcing separate materials and tools.
- Crystal clear epoxy delivers a high-end, glass-like finish that highlights natural wood grain.
- Included heat gun effectively removes bubbles for a flawless pour.
- Easy 1:1 mixing ratio simplifies the process for DIYers of all skill levels.
- Generous working time allows for careful positioning and creative designs.
Cons
- Requires separate purchase of wood and table legs, which can add to overall project cost.
- Large projects may need multiple kits, increasing total investment.
- Epoxy projects require careful surface preparation and a dust-free workspace for best results.
The TotalBoat DIY Epoxy River Table Project Kit is a comprehensive solution for anyone looking to create a custom epoxy river table, coffee table, dining table, night stand, or live edge piece. This is not a finished piece of furniture but rather a complete project kit that includes the epoxy resin, hardener, pigments, tools, and instructions needed to bring your vision to life. It is ideal for creative homeowners, interior decor enthusiasts, and DIY woodworkers who want a hands-on approach to designing unique, heirloom-quality furniture for their living room, dining area, home office, or as a statement piece for an Airbnb or rental property.
In terms of usability, the kit is designed to be approachable for beginners while still offering the quality that experienced users expect. The ThickSet epoxy features a simple 1:1 mix ratio by volume, which eliminates guesswork and reduces the chance of measurement errors. The generous working time allows you to pour, manipulate colors, and position elements without rushing. The included heat gun is a practical tool for eliminating air bubbles that can form during mixing and pouring, helping you achieve a crystal-clear, glass-like finish. According to user feedback, the epoxy self-levels well and cures to a hard, durable surface that resists scratches and everyday wear, making it suitable for tabletops that will see regular use.
Build quality and practicality are strong points of this kit. The epoxy itself is formulated to be UV resistant and non-yellowing, which is important for pieces that will be placed near windows or in bright rooms. The included black diamond pigments offer rich, consistent color that can be used to create dramatic river effects or subtle accents. The polishing materials help you achieve a smooth, glossy finish that enhances the natural beauty of the wood. While the kit does not include the wood slab or table legs, the instructions provide clear guidance on selecting and preparing materials, so even first-time builders can feel confident.
Setup and assembly require careful preparation. You will need a level, dust-free workspace, and the wood must be dry and properly sealed to prevent bubbles or adhesion issues. The step-by-step instructions are easy to follow, but the actual pouring and curing process can take 24-72 hours depending on temperature and humidity. This is not a quick weekend project, but the results are well worth the time and effort. Cleaning up is straightforward with acetone or denatured alcohol before the epoxy cures, and once cured, the surface is easy to maintain with a damp cloth and mild cleaner.
Realistic limitations include the need to purchase wood and legs separately, which can add significant cost depending on the size and type of wood you choose. For larger projects like a dining table, you may need multiple gallon kits, which increases the overall investment. Additionally, working with epoxy requires patience and attention to detail; mistakes can be difficult to correct once the epoxy sets. Beginners should start with a smaller project, like a night stand or small coffee table, to build confidence before tackling a larger piece.
Overall, the TotalBoat DIY Epoxy River Table Project Kit offers excellent value for creative homeowners and DIY furniture makers who want to produce custom, durable, and visually stunning pieces. Whether you are furnishing a modern living room, adding a unique touch to a home office, or creating a conversation-starting piece for a rental property, this kit provides the tools and materials needed to succeed. With careful planning and execution, you can build a table that will be a focal point in your home for years to come.
The TotalBoat ThickSet epoxy is formulated for clarity and durability. It cures to a hard, scratch-resistant finish that can withstand daily use on tabletops, night stands, and other furniture. The included black diamond pigments are highly concentrated and provide consistent color without streaking. The heat gun is a practical tool for removing bubbles, and the polishing materials help achieve a professional, glass-like sheen. While the kit does not include wood or legs, the quality of the epoxy and tools is designed to deliver long-lasting results when used correctly.
Assembly requires a dedicated workspace with good ventilation and a level surface. The kit includes clear, step-by-step instructions that guide you through surface preparation, mixing, pouring, and finishing. The 1:1 mix ratio is easy to measure, and the working time allows for careful application. Curing takes 24-72 hours, so plan accordingly. Cleanup of tools and spills should be done with acetone or denatured alcohol before the epoxy hardens. Once cured, the surface is easy to maintain with a damp cloth.

Pros
- Crystal clear, high-gloss finish with UV-resistant, non-yellowing formula ensures long-lasting beauty.
- Easy 1:1 mixing ratio and self-defoaming action reduce frustration and deliver professional results.
- Rock-hard durability and heat resistance make it practical for functional furniture and decor items.
- Low-odor, non-toxic, and food-safe when cured, safe for indoor crafting and kitchen-use projects.
Cons
- Requires careful measuring and mixing to ensure proper curing and avoid tackiness.
- Pouring in thin layers (1/4 inch) is recommended for bubble-free results, which can be time-consuming for larger projects.
- Some users may find the 40-minute working time limiting for complex designs or large surface areas.
The TAKIMO 1 Gallon Crystal Clear Resin Kit is a versatile epoxy system designed for a wide range of DIY projects, from coating table tops and creating river tables to crafting resin art and preserving flowers. While not a piece of furniture itself, this resin is an essential tool for homeowners, apartment renters, and DIY enthusiasts looking to refinish, protect, or create custom furniture and decor pieces with a stunning, high-gloss finish.
This resin kit is best suited for U.S. homeowners, apartment dwellers, families, small-space dwellers, and interior decor shoppers who enjoy hands-on projects. It is also ideal for Airbnb hosts and college students looking to personalize or upcycle furniture on a budget. The crystal clear, self-leveling formula ensures a professional-looking finish that enhances the natural beauty of wood, art, and other surfaces.
In terms of real-world performance, the resin delivers exceptional clarity and a glossy, glass-like surface that resists yellowing thanks to its UV-resistant technology. The self-defoaming action helps minimize bubbles, making it easier to achieve a smooth finish. The cured resin is rock-hard, scratch-resistant, and heat-resistant up to 203°F, making it durable enough for daily use on items like coasters, bar tops, and kitchen countertops. The 40-minute working time provides ample opportunity to mix colors and arrange layouts without feeling rushed.
Build quality and practicality are strong points. The resin is non-toxic and low-odor, making it safe for indoor use. Once fully cured, it is food-safe, so you can confidently use it on charcuterie boards and other kitchen items. The 1:1 mixing ratio by volume simplifies the process, reducing guesswork and potential errors. For best results, the manufacturer recommends pouring in 1/4 inch layers to allow bubbles to escape completely, ensuring a flawless, glass-like surface.
Setup and use are straightforward, but careful measurement and mixing are essential for proper curing. The kit includes detailed instructions to guide users through the process. Cleaning up uncured resin requires isopropyl alcohol, while cured resin can be sanded and polished if needed. Maintenance is minimal; simply wipe the cured surface with a damp cloth to keep it looking like new.
A realistic limitation is that pouring in thin layers can be time-consuming for larger projects like a full-size table top. Additionally, the 40-minute working time may feel tight for complex designs with multiple color layers. However, for most home and decor projects, this kit offers excellent value and professional-grade results. It is a practical recommendation for anyone looking to create durable, beautiful, and functional resin pieces for their living room, dining area, home office, or as personalized gifts.

Pros
- Bubble-free, crystal clear finish enhances the natural beauty of wood and decor pieces
- Low odor and non-toxic formulation is safer for indoor use in homes and apartments
- Deep pour up to 2 inches saves time and effort by eliminating multiple layers
- Complete kit with pumps, mixing stick, gloves, and manual makes setup hassle-free
Cons
- Requires precise 2:1 ratio by volume; measuring errors can affect curing
- Larger pours may still need a pressure pot or torch to remove tiny bubbles
- 48-hour cure time may be slower than some fast-setting alternatives for quick projects
The Craft Resin Deep Pour Epoxy Resin Kit is a versatile solution for anyone looking to create stunning, custom furniture pieces or home decor accents. Designed for pours up to two inches deep, this resin works beautifully for river tables, wooden countertops, coasters, and preserved flower art. Its crystal clear and UV resistant finish ensures your projects maintain their brilliance over time, even with indirect sunlight exposure.
This kit is perfect for U.S. homeowners, apartment renters, families, and DIY enthusiasts who enjoy crafting their own furniture or restoring vintage pieces. Whether you're building a custom dining table for your living room, creating a unique coffee table for a small apartment, or crafting decorative trays for an Airbnb rental, the low-odor, non-toxic formula makes it safe to work with indoors without strong fumes.
In real-world use, the epoxy delivers excellent clarity and bubble release thanks to its reduced viscosity and low exotherm formulation. It cures to a rock-hard, scratch-resistant surface within 48 hours and withstands heat up to 176°F. This durability is ideal for high-traffic furniture like dining tables or desk tops, where everyday use demands a tough finish. The food-safe certification also makes it a great choice for charcuterie boards or butcher blocks.
Build quality is evident in the carefully balanced 2:1 ratio system, which simplifies mixing for newcomers. The included pumps ensure accurate dispensing, and the reusable mixing stick and gloves help keep the workspace clean. After curing, the epoxy can be sanded and polished to a flawless gloss, making it easy to achieve a professional look. However, note that the epoxy is self-leveling, so your surface must be level during curing to avoid uneven thickness.
Setup and maintenance are straightforward. You simply mix equal parts resin and hardener by volume, stir gently to avoid introducing bubbles, and pour. The kit's manual provides clear instructions. For best results, work in a warm, dust-free environment. Once cured, the epoxy can be cleaned with a damp cloth and mild soap, resisting stains and scratches better than many non-resin finishes. One limitation is that larger, deeper pours may still require a heat gun or vacuum chamber to remove persistent micro-bubbles, though the formula minimizes this issue.
Overall, this Craft Resin kit is an excellent purchase for furniture makers, home decor creators, and hobbyists who value clarity, durability, and safety. Its 51-ounce size provides enough material for several medium projects or one sizable tabletop. While it may not be the fastest curing option, the results are consistent and long-lasting, making it a reliable choice for elevating any home's style.
How to Make an Epoxy Resin River Table
When it comes to crafting your own furniture, creating a unique piece like an epoxy resin river table can be a game-changer. This stunning furniture design combines the natural beauty of wood with the sleek, artistic flow of resin, resulting in a one-of-a-kind creation. While the idea of making one may seem intimidating, once you understand the basics, the process becomes a rewarding project that adds personality and style to any room.
Many people shy away from DIY epoxy resin projects due to the fear of getting the mix wrong, dealing with curing issues, or simply not having the right tools. However, with the right guidance, these barriers can be easily overcome. The good news is, once you master the art of crafting a river table, you’ll be able to create custom pieces that speak to your unique taste and style.
The allure of a epoxy resin river table lies in its ability to capture the natural patterns of wood while using resin to bring a modern flair. Whether you’re looking to create a dining table, a console, or a smaller piece like a coffee table, this guide will walk you through everything from selecting your materials to pouring the resin for that perfect river effect.
Materials You Will Need
The first step to creating a beautiful epoxy resin river table is gathering the right materials. While the main components you’ll need are wood and resin, the specific types you choose can make all the difference in the outcome. For the wood, you’ll want to select a slab with striking grain patterns, live edge wood is often a favorite due to its natural, organic feel.
For the resin, choose high-quality epoxy resin that is clear and designed for woodworking. It is important to make sure the resin is thick enough to fill the gaps between the wood without being too runny. This ensures that you can control the flow of the resin and create the river effect without worrying about the resin spilling out of place.
Aside from the wood and resin, you will also need some basic tools and materials such as a measuring cup, gloves, a heat gun (for removing air bubbles), and clamps to secure the wood pieces together. For those new to working with epoxy, don’t worry about buying too many specialized tools, most of these materials are available at your local hardware store.
Preparing the Wood Slab
Before you start mixing the resin, it’s essential to properly prepare your wood slab. The wood preparation stage is crucial because it directly impacts how well the resin will bond with the surface. Begin by thoroughly cleaning the slab and ensuring it is free from dust, dirt, or any contaminants. This step is vital as any particles left behind can affect the finished product.
Once your wood is clean, it’s time to cut it to your desired shape. Whether you’re using a large dining table slab or a smaller piece for a coffee table, make sure the edges are smooth and even. If you want a more rustic look, leave the natural edges intact. Once the shape is finalized, you may want to sand the wood to ensure a smooth surface for the resin to adhere to.
After sanding, seal the wood using a resin-friendly wood sealant. This step prevents the wood from absorbing the resin, which can cause uneven curing or discoloration. Allow the sealant to dry completely before moving on to the next step.
Mixing and Pouring the Resin
Now comes the most exciting part, mixing and pouring the epoxy resin. To get the perfect river effect, it’s important to carefully mix the resin according to the manufacturer’s instructions. In most cases, you’ll need to mix a resin and hardener in a precise 1:1 ratio. Failing to follow these ratios can result in the resin not curing properly, leaving you with a sticky or uneven surface.
Once the resin is mixed, you can begin pouring it into the groove or gap between the wood slabs. If you want to add color to your river table, now is the time to mix in pigments or dyes. Some people opt for vibrant blues or greens to mimic the look of a flowing river, while others prefer more subtle hues to complement the wood’s natural tones.
Pour the resin slowly and evenly, ensuring that it fills the entire gap between the wood pieces. You’ll likely need to pour the resin in layers, allowing each layer to cure before adding the next. This ensures that the resin is thick enough to create a strong, stable bond between the wood pieces and helps to avoid air bubbles from forming in the process.
Handling Curing Time and Finishing Touches
The curing time for epoxy resin can vary depending on the type of resin used, but typically it takes anywhere from 24 to 72 hours for the resin to fully harden. Be patient during this stage, as rushing the curing process can lead to a soft or uneven finish. Ensure that the table is left in a dust-free area while it cures to avoid any imperfections.
Once the resin is completely cured, it’s time to finish the table. You may need to sand the surface to smooth out any imperfections or rough edges. After sanding, you can apply a final coat of resin to give the table a shiny, polished look. For the final step, finish the wood with an oil or wax to protect it and enhance the natural grain.
The end result will be a stunning epoxy resin river table that combines craftsmanship with artistic flair. The contrasting elements of the natural wood and smooth, glossy resin make for a visually striking piece that can easily become the focal point of any room.
Tips for a Successful Epoxy Resin River Table
Making a successful epoxy resin river table is all about attention to detail. One of the biggest challenges people face is air bubbles in the resin. To prevent this, use a heat gun or torch to pop any bubbles that rise to the surface during the curing process. Be sure to work in a well-ventilated area and wear protective gear like gloves and a mask to avoid exposure to fumes.
Additionally, make sure your workspace is level. If your table isn’t on a flat surface, the resin can pool unevenly, ruining the look of your river table. If you’re using a large slab, consider asking for help when flipping the wood over after pouring the resin to avoid warping or damaging the wood.
Lastly, be sure to test your resin mix before pouring it onto the main project. Testing helps you understand how long the resin takes to cure and how much time you have to work with it before it sets. This will give you more control over the final outcome and help prevent any mistakes along the way.
For more tips on choosing the right materials for your project, check out our guide on how tall is a folding table. Having the proper setup will help ensure your workspace is perfect for resin projects.
If you’re planning to spend long hours at your workbench, be sure to check out the best office chair for long hours to support your back and make the crafting process more comfortable.
B0CB6TTC8CHow to Perfect the Epoxy Resin River Table Design
Building on the foundation of your epoxy resin river table project, the next phase involves perfecting your design and ensuring that all the small details align to create a visually striking, functional piece. After all, the allure of a epoxy resin river table lies in the contrast between the natural wood and the glossy resin, with each detail contributing to the final result.
Now that the basic steps are behind you, it’s time to focus on the finishing touches that can make or break your table. From dealing with imperfections in the wood to perfecting the final resin layer, this is the part where your patience and craftsmanship really shine. You’ll also need to consider how you plan to use the table, whether it will be a coffee table, dining table, or something else, because the design choices you make will affect its overall utility and aesthetics.
It’s essential to pay attention to the details here. Small mistakes, like uneven resin distribution or sharp edges, can detract from the overall quality of the table. Luckily, with a little careful planning and focus, you can ensure that the final product exceeds your expectations.
Perfecting the Resin Flow for a Stunning Look
To create a flawless epoxy resin river table , it’s crucial to get the resin flow just right. Achieving the perfect river effect often requires more than just pouring resin into the gaps between the wood. Consider the flow of resin as an art form, it should mimic the natural movement of water while also complementing the wood’s organic lines and curves.
For those looking to get the flow just right, experimenting with different techniques is key. You can manipulate the resin’s flow using a heat gun or even by adding layers to create depth and texture. For more intricate designs, try playing with various pigments or additives to enhance the epoxy resin ‘s appearance. Using subtle gradients or contrasting colors can add dimension and elevate your piece to an entirely new level.
Be mindful of the curing process too. Resin that cures too quickly can result in unsightly cracks or uneven surfaces. Be sure to mix your resin slowly and carefully, as rushing this step can lead to air bubbles or other imperfections. Taking your time during the curing process will result in a much smoother, more durable finish.
Dealing with Imperfections in the Wood
When working with natural wood, it’s important to embrace its imperfections rather than trying to hide them. Cracks, knots, and uneven surfaces are part of what makes wood unique and beautiful. However, these imperfections can present challenges when creating a perfect resin river table .
For example, if you notice that there are large cracks or uneven gaps in the wood, you can use wood filler or resin to fill them. This is particularly important when working with live edge slabs, which often come with natural voids that need to be addressed before the resin can be poured. Filling these gaps not only helps to create a more uniform surface but also prevents air bubbles from forming during the resin pour.
Once the wood is filled and sanded down to a smooth surface, be sure to give it a final check before moving on. If you’re working with live-edge wood, the resin can be used to accentuate the edges, creating an organic flow between the wood and resin . For a more rustic feel, leave some of these edges unfinished, letting the natural grain shine through as a part of the design.
Adding Final Touches: Sanding, Polishing, and Sealing
The final step in perfecting your epoxy resin river table is to focus on sanding, polishing, and sealing the surface. Sanding is crucial for ensuring that the resin is smooth and free from imperfections. Start with a coarse grit sandpaper and gradually move to finer grits until the surface feels smooth to the touch.
After sanding, polish the table with a buffing compound to bring out the full shine of the resin. This step is especially important if you want the table to have a high-gloss finish. A polished surface reflects light beautifully and enhances the overall appearance of the table.
Once the resin is polished to your liking, apply a protective sealant. This will help preserve the wood and resin and make the table more resistant to scratches, moisture, and other wear and tear. A good finish will ensure your table stays looking beautiful for years to come.
How to Care for Your Epoxy Resin River Table
Proper care is essential to keeping your epoxy resin river table looking its best. One of the easiest ways to protect the table is by regularly cleaning it with a soft cloth and mild soap. Avoid using harsh chemicals or abrasive cleaners that could damage the resin’s surface.
If you want to maintain the wood’s natural beauty, consider periodically applying a coat of wood oil to keep it moisturized and vibrant. This will help preserve the wood and prevent it from drying out, which could lead to cracks or splits over time.
When it comes to preventing scratches and scuffs, using coasters or placemats is a good idea, especially for high-traffic areas like dining rooms or living rooms. You’ll want to avoid placing hot objects directly on the table, as extreme heat can damage both the wood and the resin.
To learn more about different games you can play on a resin table, check out what is on shuffleboard tables for fun entertainment ideas that can complement your new table.